|
|
|
|
|
Real-Time Disk Change Monitor DiskBoss Ultimate and DiskBoss Server include a real-time disk change monitor capable of detecting newly created, modified and deleted files. The real-time disk change monitor provides the user with the ability to monitor one or more disks or directories, detect all changes made in the monitored file systems, send E-Mail notifications, save HTML, PDF, XML, text and Excel CSV reports, export disk changes to an SQL database, automatically trigger DiskBoss file management operations and/or execute user-custom commands or batch files. 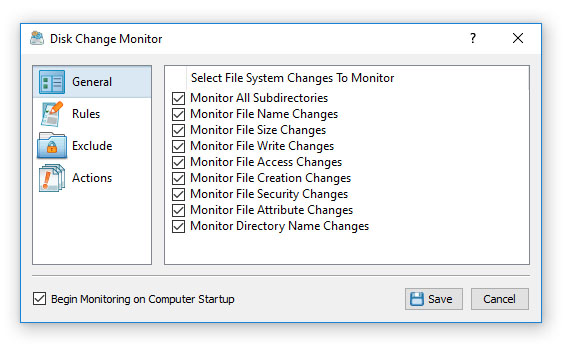
The real-time disk change monitor allows one to monitor specific types of files or file groups using flexible file matching rules. In addition, the user is provided with the ability to execute pre-configured file management commands as actions triggered by a disk change monitoring operation. For example, a user-defined file synchronization command may be automatically triggered after each X changes in a disk or directory effectively providing real-time file synchronization capabilities. 
Finally, IT and storage administrators are provided with the ability to trigger file integrity monitoring operations based on real-time disk activities, automatically validate authenticity of critical system files, prevent malicious software from making any changes in the operating system files and ensure the security of critical production servers. Configuring Disk Change Monitoring Commands The most effective way to monitor changes in one or more disks or directories is to use DiskBoss Server, which runs in the background as a service and is capable of monitoring disks, saving reports and sending E-Mail notifications even when no one is logged in. In order to create a simple disk change monitoring command, start the DiskBoss client GUI application, press the 'Add' button located on the main toolbar, select the 'Disk Change Monitoring Command' menu item, enter a unique command name and press the 'Ok' button. 
On the command inputs dialog, add one or more disks or directories that should be monitored and press the 'Next' button. On the disk change monitoring command options dialog, select the types of file system changes that should be monitored and press the 'Save' button.
By default, DiskBoss will monitor all types of file system changes, but the user is provided with the ability to customize various disk change monitoring options, specify which types of files to monitor, exclude specific subdirectories from the disk change monitoring process, configure disk change monitoring reports, E-Mail notifications and custom actions. Reviewing Detected File System Changes In order to review detected file system changes, open the DiskBoss client GUI application and click on the disk change monitoring command item. The disk change monitoring results dialog shows a list of detected file system changes and allows one to start, pause, resume and stop the disk change monitoring operation, display statistical charts, save various types of disk change monitoring reports and export detected file system changes to an SQL database.
The top view shows the list of detected file system changes. For each change, DiskBoss shows the date and time of the change, the type of the change (created, modified, renamed or deleted), the size of the modified file as recorded at the time of the change, the user name of the file owner, and the full file or directory name. 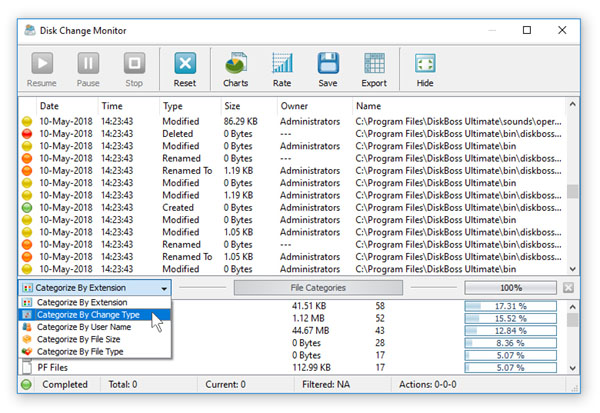
The bottom view shows categories of detected file system changes according to the currently selected file categorization mode. By default, DiskBoss categorizes detected file system changes by the file extension and displays a list of file extensions sorted by the number of detected file system changes. In addition, the user is provided with the ability to categorize changes by the change type, user name, file size and file type. Filtering File System Changes The disk change monitor allows one to filter detected file system changes by the change type, file type, extension, file size, user name, etc. Use the categories combo box located on the left side of the categories control bar to select an appropriate file categorization mode. 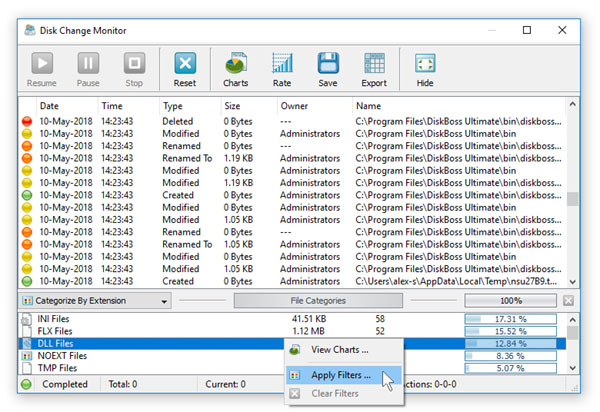
In order to filter changes using one or more filters, select the required file categorization mode, select one or more categories of changes, press the right mouse button and select the 'Apply Filters' menu item. The disk change monitor will update the change list and show file system changes matching the selected filters. 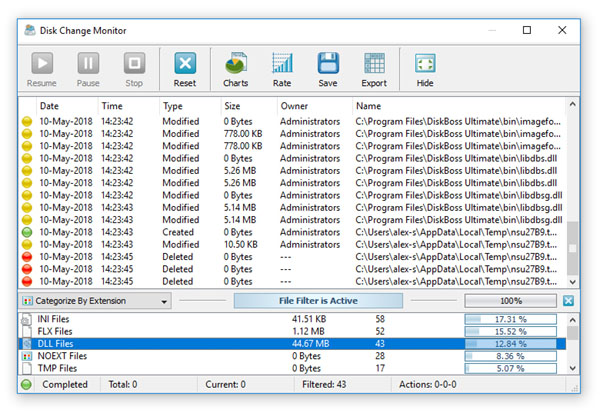
Change filters may be enabled when the disk change monitor is active filtering and displaying matching file system changes in real-time. In order to reset active file filters, just press the 'Clear' button located on the right side of the categories control bar. Disk Change Monitoring Charts The DiskBoss real-time disk change monitor provides the ability to display various types of statistical pie charts and bars charts showing the number of changes per file extension, file category, change type and user name. In order to display a pie chart, open the disk change monitoring results dialog and press the 'Charts' button. 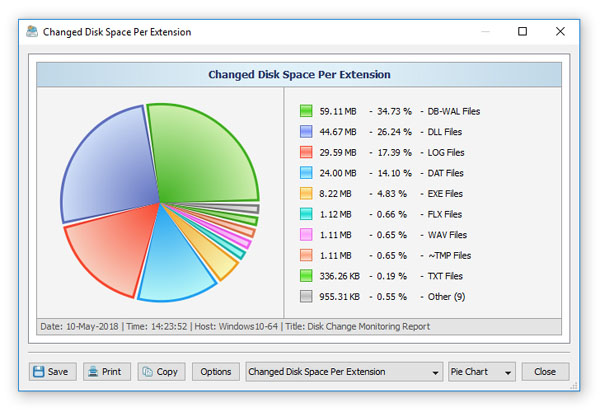
The charts dialog shows statistics according to the currently selected file categorization mode. For example, in order to display a pie chart showing the number of changes per change type, select the 'Categorize Changes Per Change Type' file categorization mode and then press the 'Charts' button. 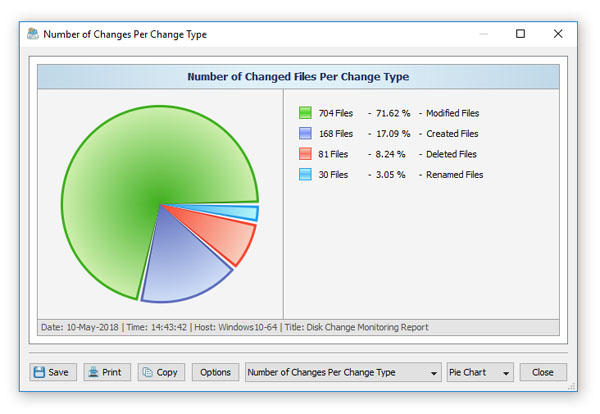
The charts dialog provides the ability to display the number of changes per file category or the total size of changed files. In addition, the user is provided with the ability to edit chart properties, copy the chart image to the clipboard or print the displayed chart image. Saving Disk Change Monitoring Reports The DiskBoss disk change monitor allows one to save HTML, PDF, XML, text and Excel CSV reports. In order to save a report file press the 'Save' button located on the disk monitor results dialog, enter a report title, select an appropriate report format, enter the maximum number of changes to export, enter the report file name and press the 'Save' button. 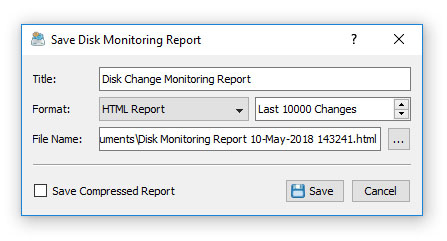
A typical report file includes a summary table showing the report date and time, the total number of file system changes that were detected, the number of changes exported to the report, the change rate, the process time and the status of the change filter. The change categories table shows up to 10 top change categories according to the currently selected file categorization mode. If the report is saved with one or more active file filters, the selected filters will be highlighted in the categories table and the change list will show changes matching the selected file filters. 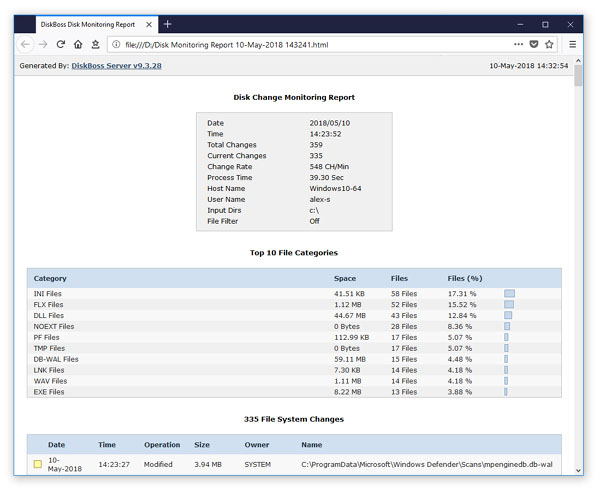
The file categories table is followed by the list of detected file system changes. For each file system change, DiskBoss shows the date and time of the change, the change type (created, modified, renamed or deleted), the size of the file as recorded at the time of the change, the user name of the file owner and the full name of the changed file or directory. Exporting Changes to an SQL Database DiskBoss provides the ability to export detected file system changes to an SQL database. In order to be able to export changes to an SQL database, the user needs to configure the ODBC database interface on the main options dialog. Open the main options dialog, select the 'Database' tab, enable the ODBC database interface, enter the ODBC data source name, ODBC user name and ODBC password to use to connect to the SQL database and press the 'Verify' button to check the specified ODBC data source. 
Once finished configuring the ODBC database interface, open the disk change monitoring results dialog, select one or more detected file system changes, press the right mouse button and select the 'Export Changes To SQL Database' menu item. On the next dialog, enter the name of the SQL database table to export the selected changes to and press the 'Ok' button. 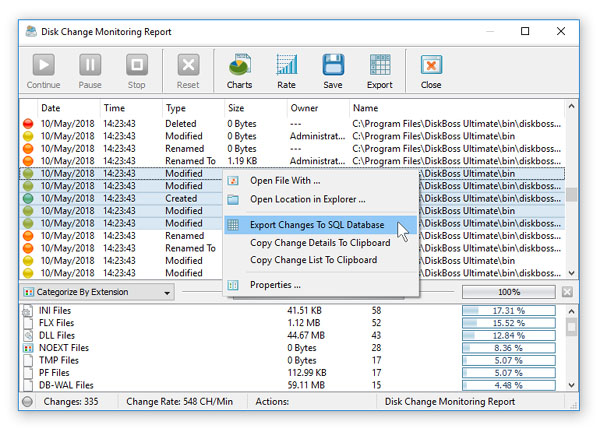
If the specified SQL database table does not exist, DiskBoss will create a new SQL database table and export the selected file system changes to the newly created database table. If the specified SQL database table already exists, DiskBoss will add selected changes to the existing SQL database table. 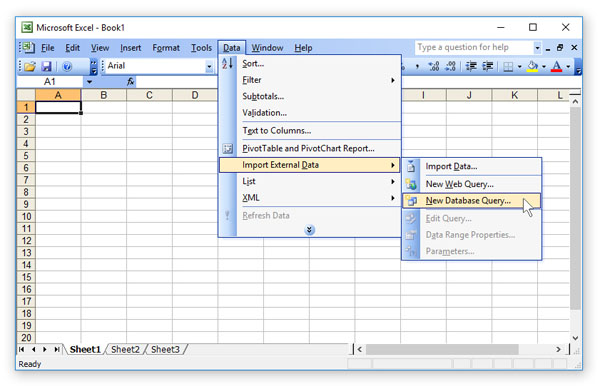
In order to import file system changes from an SQL database to Microsoft Excel, select the menu 'Data - Import External Data - New Database Query' menu item, select the ODBC data source to import the data from, select the SQL database table name that was specified during the export operation, select SQL database table columns to be imported, optionally select the data sorting mode and press the 'Finish' button. 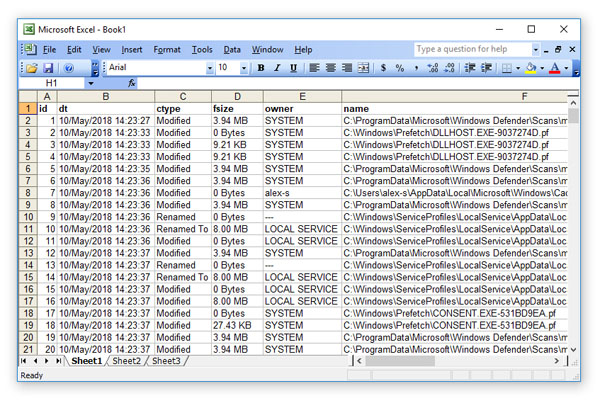
For each detected file system change, DiskBoss exports to the SQL database the following columns of data: a unique change ID, the date and time of the change, the type of the change (created, modified, renamed or deleted), the size of the file as recorded at the time of the change, the user name of the file owner and the full file or directory name. Disk Change Monitoring E-Mail Notifications DiskBoss provides the ability to send E-Mail notifications when a disk change monitoring operation detects a user-specified number of changes. In order to configure E-Mail notifications for a disk change monitoring command, open the disk change monitoring command options dialog, select the 'Actions' tab, enable disk change monitoring actions, specify the number of changes that should trigger the actions, enable E-Mail notifications and specify an E-Mail address to send E-Mail notifications to. 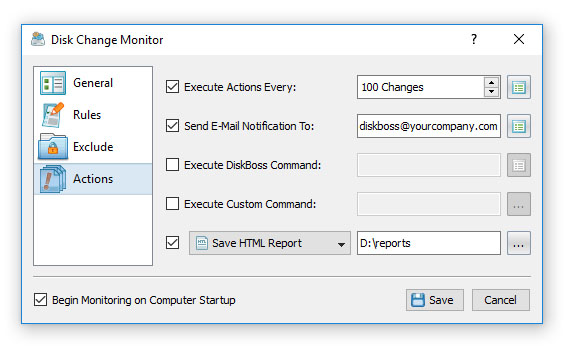
In addition, the user needs to configure an SMTP server to use to send E-Mail notifications. In order to configure the SMTP server, open the options dialog, select the 'E-Mail' tab, enable E-Mail notifications, specify the source E-Mail address, the SMTP server name, the SMTP server port, the SMTP user name and password to use to send E-Mail notifications. 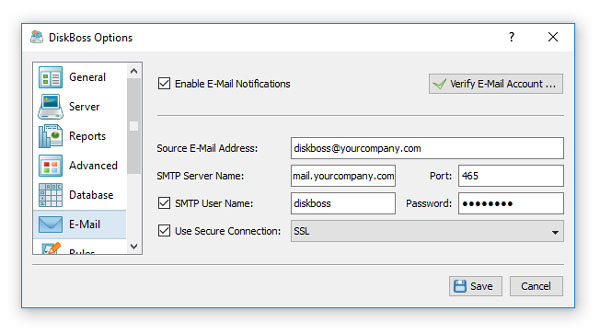
Optionally, the user can send E-Mail notifications via a secured network connection using the TLS or SSL network protocols. Once finished configuring the SMTP server, press the 'Verify E-Mail Account' button to test the specified SMTP server name, user name and password. Automatic Generation Of Disk Change Monitoring Reports In addition to E-Mail notifications, the user is provided with the ability to automatically save disk change monitoring reports in a user-specified directory. In order to enable automatic report generation, open the disk change monitoring command dialog, select the 'Actions' tab, enable disk change monitoring actions, specify the number of changes that should trigger the monitoring actions, enable the report generation action, select an appropriate report format and specify a directory where to save disk change monitoring reports. 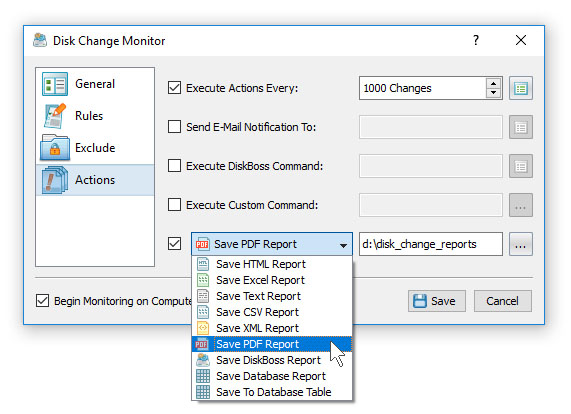
During runtime, DiskBoss will monitor the specified disks and directories and automatically save disk change monitoring reports in the specified directory every X file system changes as configured on the 'Actions' tab. Each report file will be saved with an automatically generated file name including the date and time of the report. 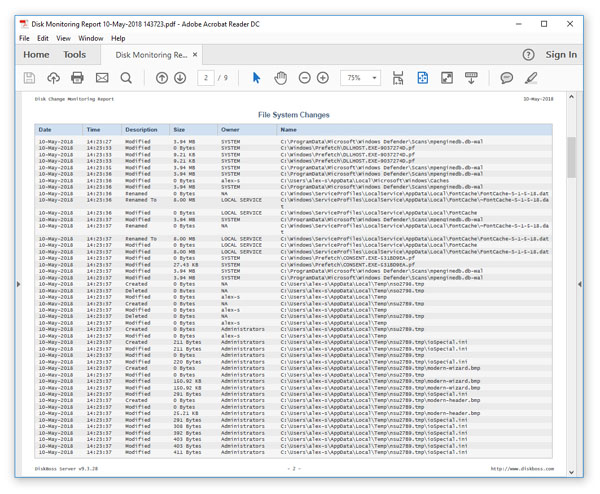
For each file system change in a report file, DiskBoss shows the date and time of the change, the change type (created, modified, renamed or deleted), the size of the file as recorded at the time of the change, the user name of the file owner and the full name of the changed file or directory. Monitoring Specific File Types or File Categories Active production servers may have a very high rate of disk changes resulting in very long disk change monitoring reports significantly complicating identification of critical file system changes and resulting in additional overhead on running, production systems. In order to minimize the number of unimportant file system changes recorded by a disk change monitoring operation, DiskBoss provides the ability to limit the disk change monitoring operation to user-specified types of files. 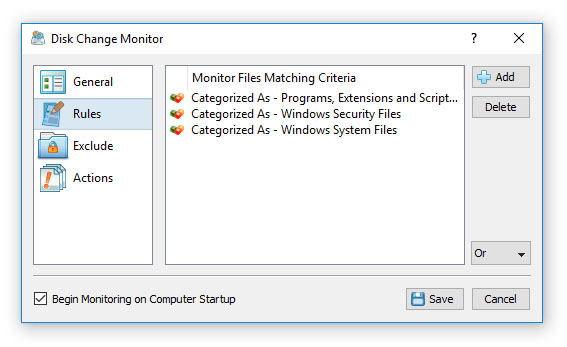
For example, the user may configure a disk change monitoring command to monitor only programs and executable files and exclude changes detected in all other types of files. In order to configure a disk change monitoring command to monitor specific types of files, open the disk change monitoring command options dialog, select the 'Rules' tab and add one or more file matching rules specifying which types of files to monitor. During runtime, the disk change monitor will evaluate detected file system changes and just skip all changes not matching the specified rules. 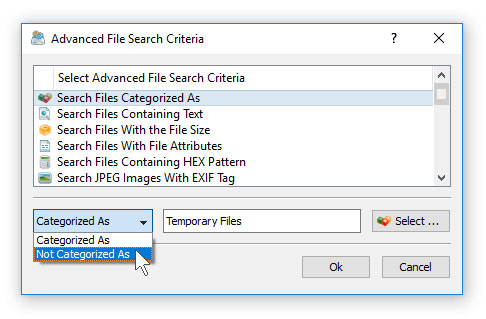
Another option is to exclude specific types of files from the disk change monitoring process using one or more negative file matching rules. For example, in order to exclude temporary files from a disk change monitoring operation, add a file matching rule, select the 'Temporary Files' file category and select the 'Not Categorized As' rule operator. Now, the disk change monitoring operation will skip all temporary files from the disk change monitoring process. Excluding Subdirectories from the Monitoring Process Sometimes, it may be required to exclude one or more subdirectories from the disk change monitoring process. For example, if you need to monitor a disk excluding one or two special directories, you may specify the whole disk as an input directory and add the directories that should be skipped to the exclude list. 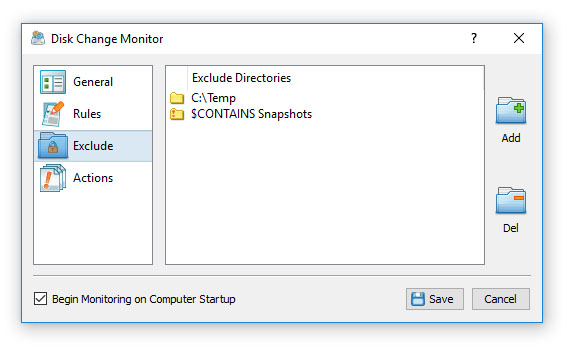
In order to add one or more subdirectories to the exclude list, open the disk change monitoring command dialog, select the 'Exclude' tab and press the 'Add' button. All files and subdirectories located in the specified exclude directory will be excluded from the disk change monitoring process. In addition, users are provided with a number of exclude directories macro commands allowing one to exclude multiple directories using a single macro command. DiskBoss provides the following exclude directories macro commands:
For example, the exclude macro command '$CONTAINS Temporary Files' will exclude all directories with 'Temporary Files' in the full directory path and the exclude macro command '$REGEX \.(TMP|TEMP)$' will exclude directories ending with '.TMP' or '.TEMP'. Triggering Automated File Management Operations One of the most powerful capabilities of DiskBoss is the ability to trigger custom file management operations after a user-specified number of file system changes is detected in one or more disks or directories. This capability may be very effectively used to trigger file synchronization, policy-based file management and automatic file delete and data retention operations on production servers and corporate storage systems. 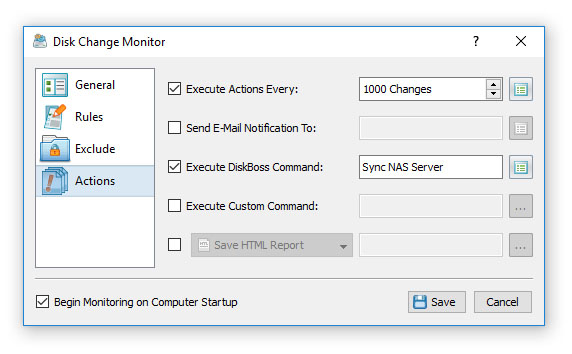
For example, in order to automatically synchronize a server with a NAS device, create a file synchronization operation configured to synchronize a source directory on the server to a destination directory on the NAS device, create a disk change monitoring command configured to monitor the source directory on the server, open the disk change monitoring command dialog, select the 'Actions' tab, enable disk change monitoring actions, specify the number of file system changes that should trigger the action, enable the DiskBoss command action and select the previously configured file synchronization command to be executed. 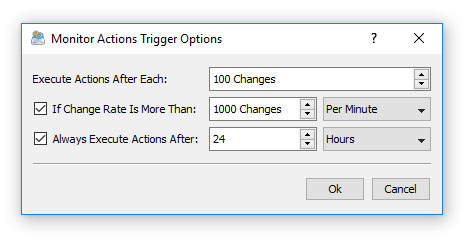
In addition to the ability to trigger the disk change monitoring actions every X file system changes, DiskBoss allows one to trigger the actions if the change rate reaches a user-specified number of changes per minute or per hour. Finally, the user is provided with the ability to trigger the disk change monitoring actions after a user-specified timeout even if the number of detected file system changes is less than the specified value. Triggering File Integrity Monitoring Operations In addition to the real-time disk change monitor, DiskBoss provides the file integrity monitor, which is capable of saving digital security signatures of critical system files and then periodically verifying authenticity of critical system files by comparing the current digital security signatures to the previously saved digital security signatures. One of the most powerful capabilities of DiskBoss is the ability to monitor one or more disks or directories and automatically trigger verification of critical system files based on real-time disk activities and then send E-Mail notifications and generate reports if any unauthorized changes are detected in critical system files thus ensuring the security of critical systems and production servers. 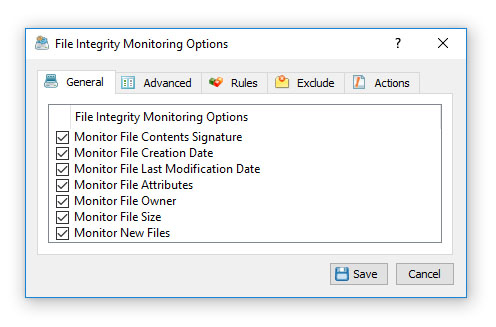
For example, in order to monitor critical files in the Windows system directory, create a file integrity monitoring command, configure the command to monitor the Windows directory, add a file matching rule limiting the monitoring operation to programs and executable files and than save a reference digital signature of the Windows system directory. 
Now, create a new real-time disk change monitoring command, configure the command to monitor the Windows system directory, select the 'Actions' tab, enable disk change monitoring actions, enable the DiskBoss command action and specify the previously configured file integrity monitoring command to be automatically triggered after each X changes detected in the Windows system directory. The file integrity monitoring command will scan the Windows system directory, verify digital signatures of programs and executable files, check if there are any modified programs or executable files and send an E-Mail notification if required. Monitoring Disks Using DiskBoss Command Line Utility In addition to the DiskBoss GUI application, DiskBoss Ultimate and DiskBoss Server provide a command line utility allowing one to monitor one or more disks or directories from batch files and shell scripts. The DiskBoss command line utility is located in the '<ProductDir>/bin' directory. diskboss -monitor -dir <Directory 1> [ ... <Directory X> <Options> ] This command monitors the specified disks or directories and displays detected file system changes on the standard output. In addition, the user is provided with the ability to export detected file system changes to HTML, XML, text, Excel CSV, PDF and XML reports. diskboss -execute <User-Defined Disk Monitoring Command> This command executes a user-defined disk change monitoring command pre-configured using the DiskBoss GUI application or imported from an XML file. Options: -exclude_dir <Exclude Directory 1> [ ... <Exclude Directory X> ] This option specifies the list of directories that should be excluded from the disk change monitoring operation. In order to ensure proper parsing of command line arguments, directories containing space characters should be double quoted. -save_html_report [ Report File Name ] This option saves disk change monitoring results to an HTML report file. If no file name is specified, DiskBoss will automatically generate a file name according to the following template: diskboss_[date]_[time].html and save a report file in the user's home directory. -save_csv_report [ Report File Name ] This option saves disk change monitoring results to an Excel CSV file. If no file name is specified, DiskBoss will automatically generate a file name according to the following template: diskboss_[date]_[time].csv and save a report file in the user's home directory. -save_text_report [ Report File Name ] This option saves disk change monitoring results to a text report file. If no file name is specified, DiskBoss will automatically generate a file name according to the following template: diskboss_[date]_[time].txt and save a report file in the user's home directory. -save_pdf_report [ Report File Name ] This option saves disk change monitoring results to a PDF report file. If no file name is specified, DiskBoss will automatically generate a file name according to the following template: diskboss_[date]_[time].pdf and save a report file in the user's home directory. -save_xml_report [ Report File Name ] This option saves disk change monitoring results to an XML report file. If no file name is specified, DiskBoss will automatically generate a file name according to the following template: diskboss_[date]_[time].xml and save a report file in the user's home directory. -save_report [ Report File Name ] This option saves disk change monitoring results to a native DiskBoss report file, which may be later loaded in the DiskBoss GUI application for future review and analysis. If no file name is specified, DiskBoss will automatically generate a file name according to the following template: diskboss_[date]_[time].flr -save_to_database This option saves disk change monitoring results to an SQL Database using the ODBC interface configured in the DiskBoss GUI application options dialog. -title <Report Title> This option sets a custom report title. -label <Report Label> This option sets a custom report label. -compress This option instructs to save compressed report files. -v This option shows the product's major and minor versions. -help This option shows the command line usage information. |
DiskBoss News
|

